
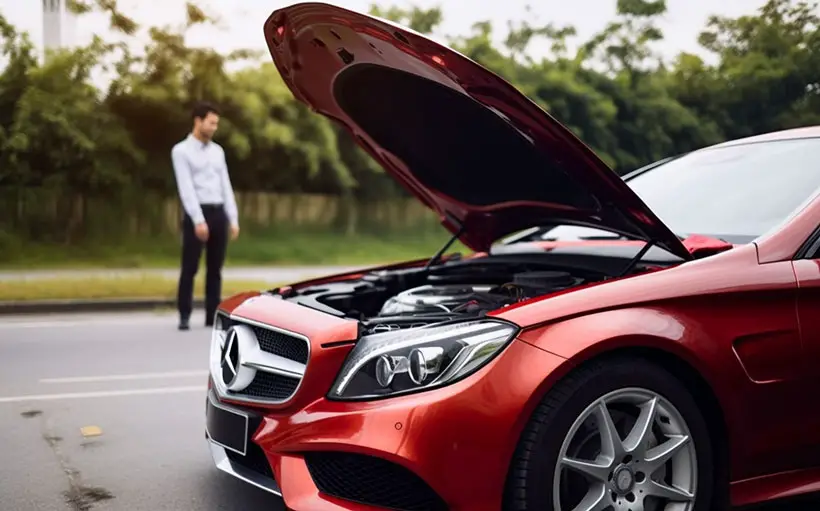
Driving an overheated car is risky. And applying tricks can not solve this problem. We need a permanent cure.
So, why is my car overheating? Cars overheat mainly because of
- A bad thermostat or low coolant or engine oil level.
- Wrong mixture of coolant or dirty coolant.
- It may be due to the radiator parts or loose serpentine belts.
- Mixture of coolant with engine oil or leakage in the cooling system.
- A bad or leakage water pump, etc.
Stay with us to know the problems and their solutions in this post.
Why Is My Car Overheating? Causes and Solutions in Details
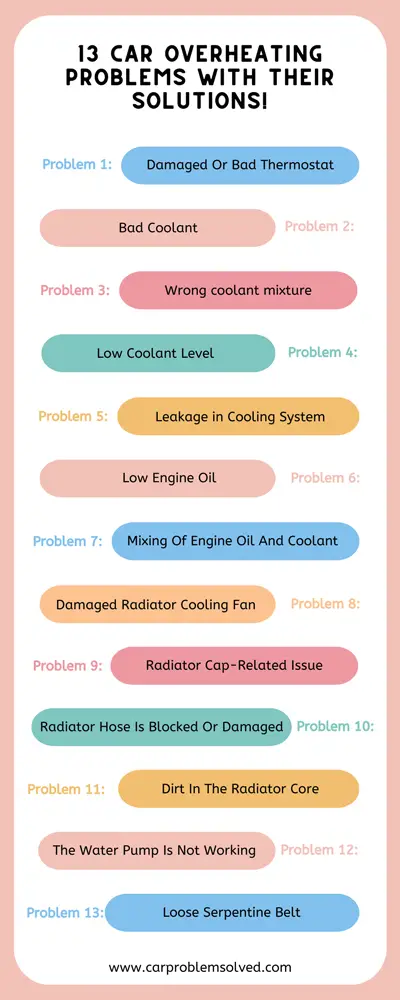
All the possible causes and their solutions are given below.
Problem 1: Damaged Or Bad Thermostat
When the engine is cold, the thermostat springs keep the hot water in the engine and warm up fast. Once the engine and the spring heat up, it opens the valve and lets the water go into the radiator to cool the engine.
But a bad thermostat will not allow the water to enter at the right time. So the engine will heat up easily. You can see other symptoms of a bad thermostat, like leakage of coolant.
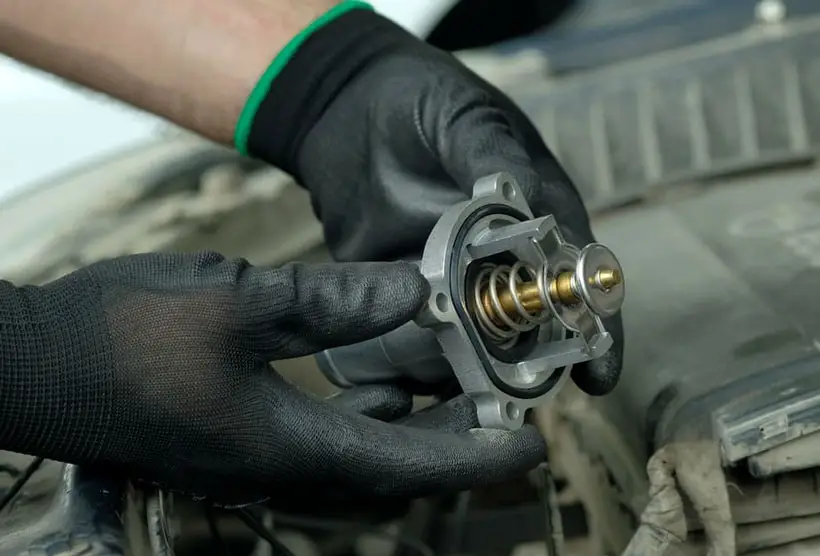
Solution:
A damaged or bad thermostat can not perform its task properly. The only solution is to replace the thermostat. To replace it, follow the steps below.
- Step 1: Unbolt the thermostat housing from the engine block. Do not damage any part of the housing while unbolting
- Step 2: Remove the thermostat
- Step 3: Inspect the thermostat housing and remove the gasket material from the mating surface of the housing
- Step 4: Now remove the gasket material from the engine block
- Step 5: Compare the new thermostat with the old one. Ensure that the new one is similar to the old one
- Step 6: Fit the new thermostat
- Step 7: Ensure that the air bleed hole is in the correct position
- Step 8: Check the thermostat is fully seated in the groove
- Step 9: Fit the correct-sized gasket
- Step 10: Carefully refit the thermostat housing to the engine block and screw the bolts
- Step 11: Now run the engine to circulate the coolant
- Step 12: Check the temperature indicator gauge to see if the temperature is normal or not
- Step 13: If there is no other problem causing overheating, the temperature will be in the normal range
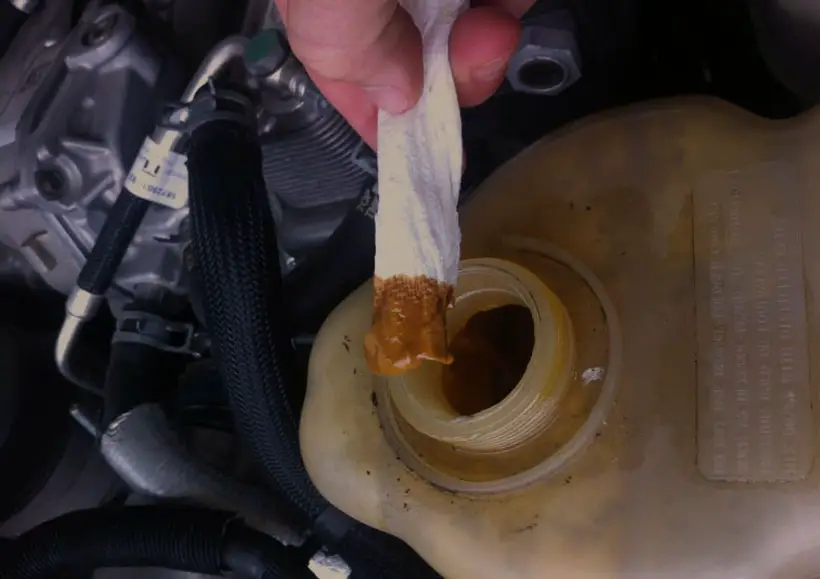
Problem 2: Bad Coolant
In case you are not changing or refilling the reservoir for a long time, there must be bad or dirty coolant circulating in the system. There can be chemical reactions or old coolant mixing that causes the coolant to become dirty.
Dirty coolant boils and overheats easily. So, the engine will also heat easily, and the car will face overheating issues. You can detect the bad coolant by its appearance. It will change color.
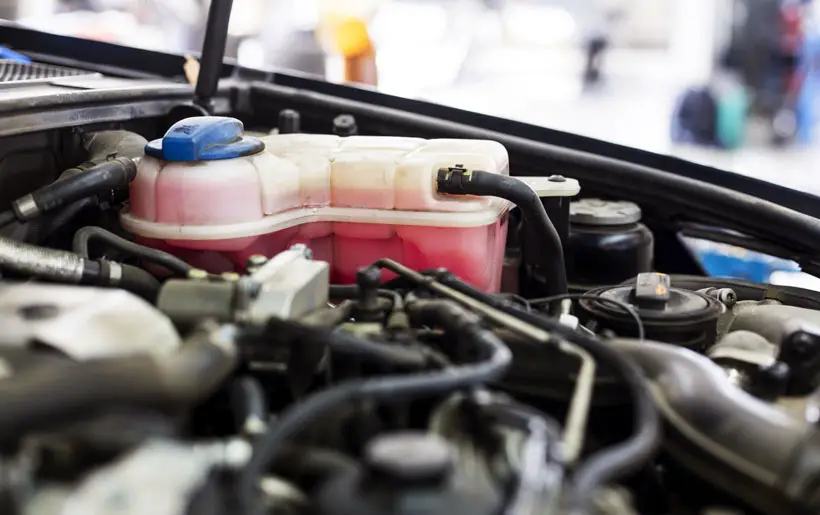
Solution:
A bad coolant should be changed immediately after detection. You must drain all the remaining coolant in the reservoir, engine, and radiator. Follow the steps here.
- Step 1: Set the temperature control to maximum heat
- Step 2: Turn the ignition and open up the heater core
- Step 3: Completely cool down the radiator and engine
- Step 4: Place a pan underneath the radiator
- Step 5: Loosen the drain plug
- Step 6: Allow the coolant to drain
- Step 7: Now move the pan underneath the engine and remove the engine drain bolt. This removes the coolant that is stuck in the engine block and heater core
- Step 8: Apply some high-temperature thread sealant to the engine drain bolt and reinstall it
- Step 9: Now tighten the radiator drain plug
- Step 10: Now remove the coolant reservoir. Make sure it is clean and place it
- Step 11: Now fill the reservoir with coolant properly mixing with antifreeze up to the maximum line
- Step 12: Pour the coolant into the radiator
- Step 13: Now start the engine and make sure the system can purge all the air out. Add more coolant if needed
- Step 14: Once all the air is out of the system, fully tighten the radiator cap
- Step 15: Run the engine one more time and check the leaks
Problem 3: Wrong coolant mixture
The mixing could be the wrong coolant with new coolant or with the wrong antifreeze, or with bad coolant and new coolant. Also, the mixing of coolant and water in the wrong proportion is faulty.
Faulty mixing of coolant can damage the system. Only changing the coolant is not the right solution in this case. You have to clean the whole system.
Solution:
The only way to get rid of the problem is a coolant flush. Follow the steps.
- Step 1: Jack up the car and put a jack stand
- Step 2: Place a drain pan under the car
- Step 3: Remove the outlet and inlet hose of the radiator. And remove the drain plug
- Step 4: Now continue to dump water into the system until you see stuff coming out of the hose to be clear
- Step 5: Now pour the cooling system cleaner and water into the reservoir
- Step 6: Run the engine for 10 minutes for light cleaning and 6 hours for heavy cleaning
- Step 7: Now stop the engine and let it cool down
- Step 8: Drain the cleaner
- Step 9: Again flush the system with water
- Step 10: Put the inlet and outlet hose in position
- Step 11: Pour coolant up to the level mentioned in the manual
- Step 12: Run the engine for a while and bubble-free the system
- Step 13: Put the cap back
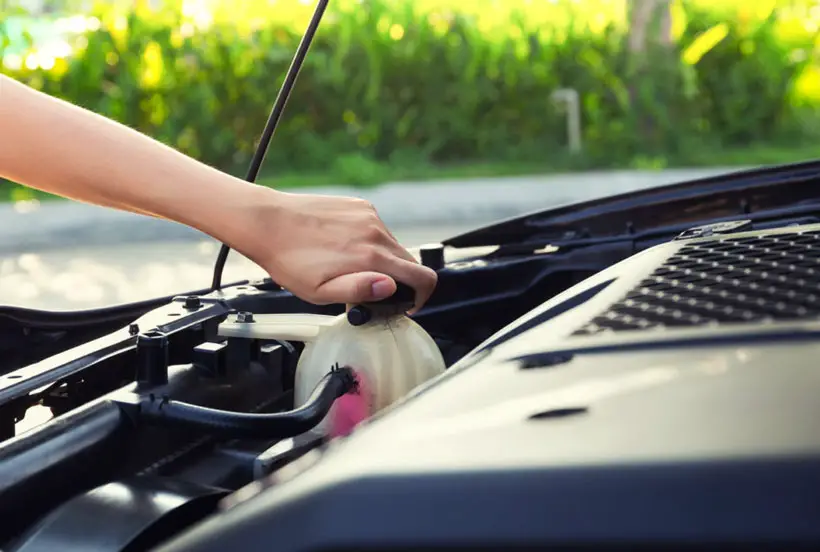
Problem 4: Low Coolant Level
Coolant plays the main role in cooling down the engine. While passing through the system, the engine releases heat, and the coolant absorbs it. To cool down the engine properly, the coolant level must be good.
If the coolant level goes low, it can not absorb all the heat while circulating. The engine remains hot, and the result causes overheating.
Solution:
You need to check the coolant level and then refill it. To check the coolant-
- Step 1: Cool down the engine
- Step 2: Now check the reservoir. Here two lines are given as low and full. The reservoir is translucent. If the level is near the low, you need to add coolant
- Step 3: If the coolant is clean, you do not need to drain the coolant. If it is bad, you have to drain it
- Step 4: Fill the reservoir with coolant
- Step 5: Check the coolant level once every two weeks. A low level of coolant can cause severe damage to the car engine
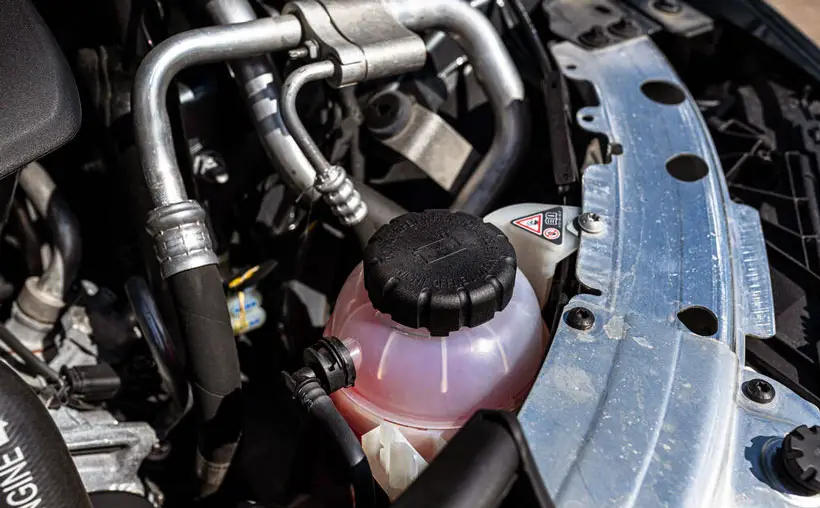
Problem 5: Leakage in Cooling System
As we see, coolant helps to reduce heat from the engine. But if there is a leak, the coolant level will gradually decrease. A low-level coolant is unable to reduce heat from the engine.
Also, a leakage allows the air to enter the system. The cooling system is a closed system. Air presence in the coolant interrupts the cooling process. It does not allow the engine to cool down. Rather it helps to overheat and damage the engine.
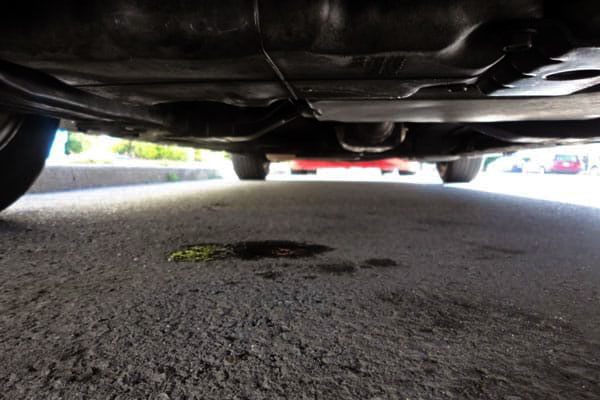
Solution:
Leakage is mainly found in the joints. Or you may find that coolant is leaking underneath the car due to a loose drain plug. This type of problem mainly needs replacement.
Replacing without experience is not a good idea. You should go to the auto repair shop for a replacement. It will not cost more.
Problem 6: Low Engine Oil
To run a car, a proper amount of engine oil is needed. But if the engine oil level goes low, the engine part gets dry. It means the engine parts are not properly lubricated while driving. That causes a lot of friction in the engine surface, and the car overheats in a short time.
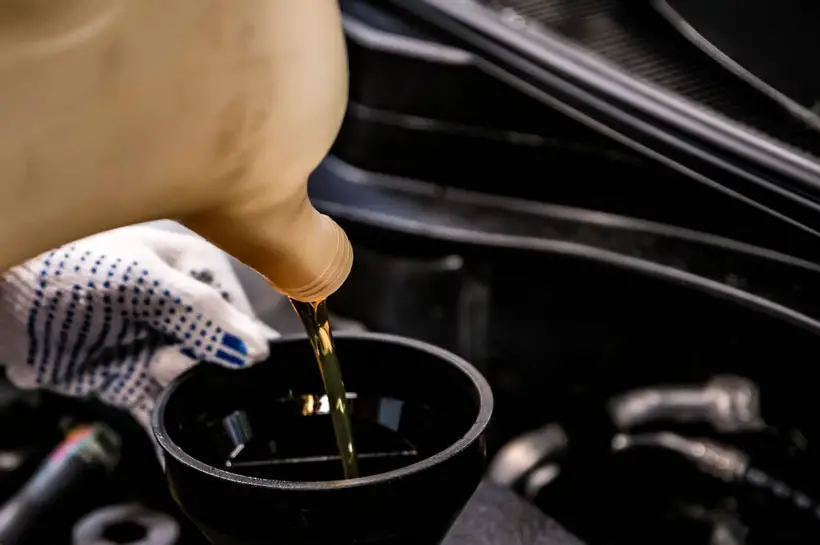
Solution:
You should check the engine oil level regularly. Do it following the steps below.
- Step 1: Turn off the engine and sit for a few minutes
- Step 2: Locate the engine oil dipstick. It is usually yellow or orange. Don’t be confused with the automatic transmission fluid dipstick
- Step 3: Pull the dipstick and wipe it with a paper towel to remove the excessive oil
- Step 4: Place the dipstick back in its position
- Step 5: Wait for a few seconds and pull it back
- Step 6: There are two levels in the dipstick. Maximum level and add level. Read the level. If the level is on the ‘add’ level, turn the cap of the engine counterclockwise
- Step 7: Use a funnel to pour engine oil
- Step 8: Check the level once, then place the cap
- Step 9: You should check the engine oil level once a month
Problem 7: Mixing Of Engine Oil And Coolant
Engine oil and coolant run in different compartments. Mixing engine oil and coolant is not normal. That causes when there is any leakage present. And mixing causes overheating of the engine.
A damaged or bad gasket creates leakage between the two compartments and allows the mixing of engine oil and coolant. You will find out that oil or white bubbles are floating into the coolant. Or you can also find out the presence of coolant in the engine.
Likewise, mixing can reduce the lubrication of the engine parts. Also, it can change the engine viscosity. As a result, low oil pressure-related trouble appears.
Solution:
To stop mixing engine oil and coolant, you need to replace the damaged head gasket. Replacing a damaged head gasket is not an easy task. You should go to the local service repair shop and replace it with a similar head gasket.
Problem 8: Damaged Radiator Cooling Fan
A radiator fan allows air to enter the atmosphere and releases hot air through the radiator core. The fan enters cool air into the radiator. Here the exchange of heat occurs between the atmospheric air and the coolant.
Then the radiator fan removes the heated air from the radiator and again enters fresh air. If the radiator fan is damaged, broken, or running at a low speed, the cooling system will fail to cool down the engine.
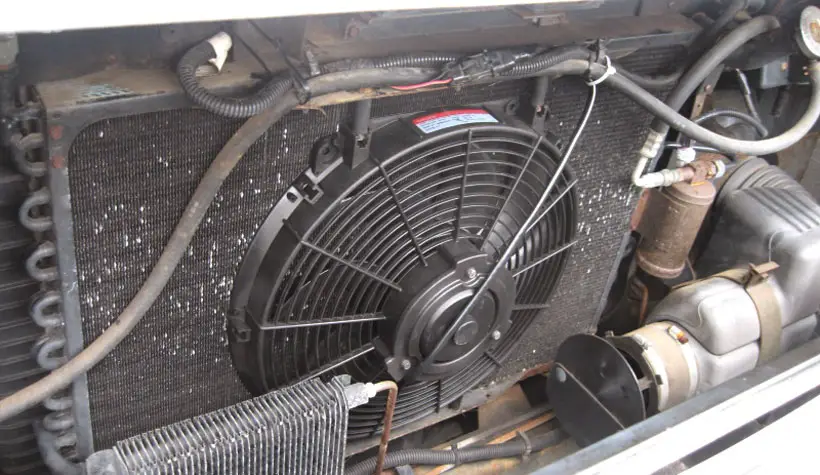
Solution:
If the radiator fan is damaged, you should replace it following the process below.
- Step 1: Remove the mass airflow sensor connector in the air box
- Step 2: Now remove the hose of the vent
- Step 3: Take the clamp off the throttle body and remove the hose
- Step 4: Unscrew the bolts and take the lid off
- Step 5: Take the air filter out
- Step 6: Take out the air box carefully and disconnect it from the vent. Pull out the vent of the transmission
- Step 7: Plug out the electrical plug
- Step 8: Set a drain pan underneath the lower radiator hose
- Step 9: Release the hose and drain the coolant
- Step 10: Now release the upper radiator hose
- Step 11: Now remove the radiator cooling fan
- Step 12: Replace it with a new one
- Step 13: Now follow the same process reversely
To do this task, you need previous experience. If you have less experience, take help from an expert.
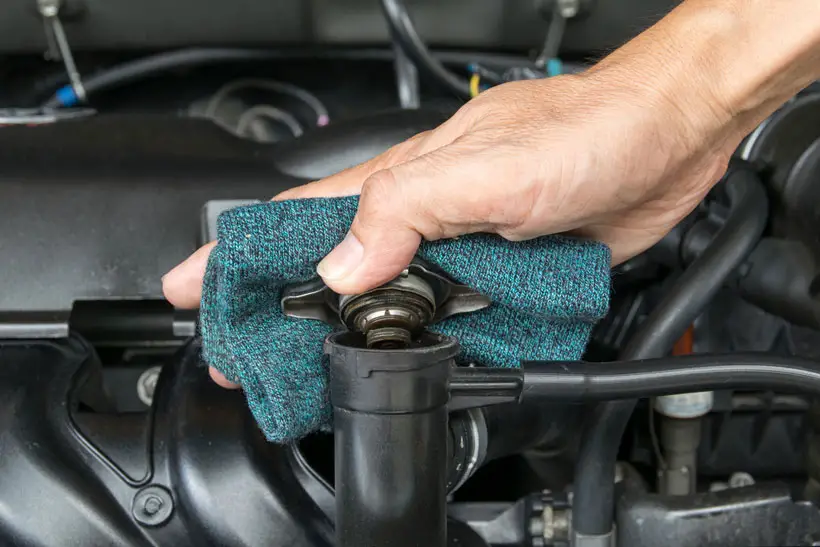
Problem 9: Radiator Cap-Related Issue
The radiator cap controls the system pressure. If the radiator cap is not working, the pressure will not normalize. It will then overheat the engine.
Also, the damaged radiator cap can create leakage. Air will enter the throw that way and mix with coolant. It will hamper the cooling system.
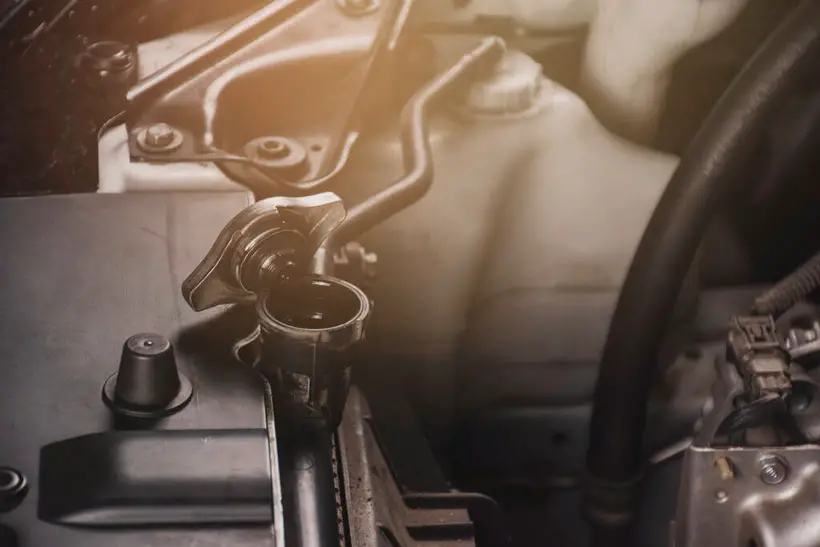
Solution:
A damaged radiator cap should be replaced as soon as possible. Buy a new radiator cap mentioned in the manual or similar to the damaged one.
Do not change the radiator cap when the engine is hot. Otherwise, the coolant will blow out. Now push down the radiator cap and keep twisting. Then remove it and place the new one collectively and push it down. Keep twisting it until it is tightened.
While replacing the cap, check the coolant level and the color is in the right conditions.
Problem 10: Radiator Hose Is Blocked Or Damaged
A blocked radiator hose hampers the circulation of the coolant. It resists the flow, and the engine can not release all the heat as it comes in contact with less coolant.
The damaged radiator hose causes leakage. It could be internal or external leakage. Both of them can catch fire and cause severe accidents. However, leakage causes the coolant level to be low.
Solution:
In case of a blocked radiator hose, you should apply the coolant flush method. But if it is damaged, you should change it. Detect the damaged part. Go to the auto repair shop and change that part.
Problem 11: Dirt In The Radiator Core
Air enters the radiator by the radiator core. While entering, the core catches dust, debris, or pollution. They keep accumulating and block the core.
For the blockage, air can not pass easily. So the hot air remains inside for a long time. It delays the cooling process.
Solution:
Cleaning the radiator core is not hard. But to remove the radiator core, you need to follow a long process. Without experience, you can damage other parts while removing them. To remove the radiator core, you need to follow by removing the radiator cooling fan.
Then wash out both parts. Replace if needed. Dry it out and place it back in the previous position. You can follow the following video to remove the radiator core.
Problem 12: The water Pump Is Not Working
The water pump regulates the coolant. It decides when the coolant should go to the radiator and when it should go into the engine compartment. But if it is not working, the rhythm of the cooling system will fail.
If the cooling system starts working haphazardly, the car will overheat. Leakage is also common for a damaged water pump. If the top of the hose is hot and cold in the bottom, it is a sure sign that the water pump is not working.
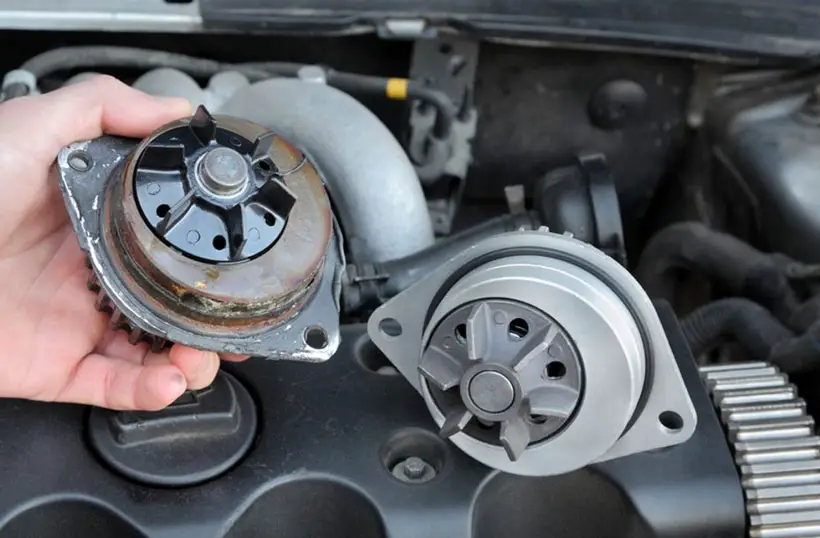
Solution:
A bad water pump should change. You can change it in the repair shop. But you have to pay a lot for it. You can change it by yourself by following these steps:
- Step 1: Cool down the engine
- Step 2: Drain the coolant from the whole system
- Step 3: Remove the positive and negative cables from the battery
- Step 4: Remove the battery and battery box
- Step 5: Now relieve the tension of the serpentine belt and remove it
- Step 6: Unscrew three bolts and remove the pulley
- Step 7: Take the new water pump and remove the bolts from the old one. The bolts are different in size
- Step 8: So unscrew the bolts one by one and place them in the new one in the same place
- Step 9: While removing the bolts, make sure you don’t see any coolant coming out with the bolts. If coolant comes out from bolt holes, mark the bolts. You have to apply some thread sealer on the bolts when you install them
- Step 10: Now remove the water pump
- Step 11: Clean the gasket material from the surface
- Step 12: Put the bolts in the old water pump in a similar manner and put two bolts in the new one
- Step 13: Install a gasket in the screw
- Step 14: Hold the water pump in position and screw tight the two bolts. Screw the other bolts from the old one into the new one
- Step 15: Now place the pulley and install the bolts
- Step 16: Remove the pressure on the tensioner and slide the belt over the pulley. Release the pressure
- Step 17: Place the battery box and the battery. Connect the cables
- Step 18: Now add a new coolant
- Step 19: Ensure that coolant is not leaking underneath the car
Don’t drive after repairs. Heat the engine for some time and confirm that your car is not overheating.
Problem 13: Loose Serpentine Belt
A serpentine belt helps to regulate the cooling system. It may get damaged or loosen. If damaged, the water pump stops working. Other problems of serpentine belt failure like creating low RPM, create extra pressure on the engine.
Also, a damaged serpentine belt stops working the engine suddenly. A sudden brake can cause an accident and engine damage. And the water pump can not co-operate properly, which results in overheating.
Solution:
If the serpentine belt is damaged, you need to change it. If it is loose, you should tighten it. This video will help you to tighten the serpentine belt easily.
FAQs
Before going to wrap up, take a look at the commonly asked questions by people about overheating cars.
Yes, the engine of an overheating car can be saved. Overheating does not always damage the engine. If you detect the problem as soon as it starts and take the necessary steps, the engine could be saved.
The fastest way to cool down an overheated car is to stop the car immediately and rest it until it cools down. You should turn off the AC and open the windows and door. Open the car bonnet after 5 to 10 minutes.
No, you are not recommended to drive an overheated car. Just immediately stop it and take the next steps to solve the issue.
Conclusion
Numerous causes are responsible for car overheating, and solutions are different. Overheating for a long time and driving an overheating car can damage the engine badly. In that case, you have to pay a lot to change the engine.
Regular maintenance of the car can detect problems early. Solving problems early can save the parts from damage. However, if any part of the cooling system or radiator gets damaged and can be fixed by yourself, do it DIY. Otherwise, take the help of an expert.