
Ever found yourself cruising down the road, only to be interrupted by that irksome rattling sound coming from under your car? I know I have, and let’s be honest, it’s as annoying as nails on a chalkboard. That racket is often due to a loose heat shield around your exhaust system, and I’m here to guide you through fixing it without a sweat.
I’ll show you how to diagnose the problem, secure the heat shield, and ensure your ride is as quiet as a mouse once again. Trust me, it’s easier than you think, and you won’t need a mechanic’s expertise to get the job done. Let’s dive in and put an end to that exasperating exhaust noise once and for all.
Diagnosing the Rattling Sound

When that irritating rattle starts up from beneath my car, I know it’s time to get to the bottom of it. The first step is figuring out whether the heat shield is the culprit. Here’s how I diagnose a rattling heat shield:
- Listen Closely: I start the car and let it idle to listen for the rattling noise. It’s easiest to detect when the engine is running at lower RPMs.
- Road Test: I take the car for a quick drive. This helps me confirm if the noise occurs under normal driving conditions. Typically, the rattle becomes prominent as the exhaust system heats up and expands.
- Visual Inspection: Once the car is safely parked and the engine cooled down, I perform a physical inspection. I look around the exhaust system for any loose metal pieces that could be vibrating against each other.
- Heat Shield Check: Wearing protective gloves, I gently press on the heat shield to test its stability. If it‚Äôs loose, it’ll likely make a noise similar to the one I‚Äôm trying to fix.
If the rattling persists, I try a few other troubleshooting steps:
- Checking for debris trapped between the heat shield and the exhaust.
- Inspecting for rust or damage which might be causing the metal to flake and rattle.
- Looking into other components that may be misaligned and hitting against the heat shield.
Through this process, I’m able to determine if the heat shield is indeed the source of that annoying rattling noise. If my investigation points towards a loose heat shield, I’m ready to move on to securing it firmly in place. With the right tools and a bit of patience, I find it’s something I can manage without a trip to the mechanic.
Tools You’ll Need
Before diving into the process of securing a loose heat shield, it’s important to gather all the necessary tools for a smooth operation. Having the right equipment on hand will not only make the job easier but also prevent any potential damage to your car. From my experience, here’s what you’ll typically need:
- A set of socket wrenches: Essential for loosening and tightening bolts that secure the heat shield.
- Screwdrivers: A variety of flat head and Phillips head screwdrivers can come in handy for dealing with different types of fasteners.
- Work gloves: Protect your hands from sharp edges and heat while working under your vehicle.
- Safety glasses: Always prioritize eye protection to shield against debris and dust.
- Jack and jack stands: These will elevate and stabilize your car, providing safe access to the exhaust system.
Depending on the specific issue, you might also require:
- Metal clamps or hose clamps: If the heat shield is simply loose, these can help to re-secure it.
- High-temperature exhaust repair tape: For temporary fixes of small holes or separations.
- A metal brush or sandpaper: Useful for cleaning off rust and debris before reattaching or repairing the shield.
When it’s time to get under the car, ensure it’s safely supported with jack stands; never rely solely on a jack. After locating the heat shield and determining the right approach, use your tools efficiently. If you’re applying clamps, position them strategically where they’ll apply even pressure without deforming the shield. Should the brackets or mounts be broken, you may need to replace them entirely.
Remember, the key to a job well done lies in preparation and precision. With the right tools in your belt and a careful, methodical approach, you’re more likely to fix the problem effectively. Keep your workspace organized and return tools to their proper place as soon as you’re finished using them, ensuring everything’s within reach when you need it.
Locating the Loose Heat Shield
When it comes to pinpointing the source of that pesky rattling noise beneath your vehicle, identifying the loose heat shield is a critical step. I’ll guide you through the process so you can quickly and effectively spot the problematic area.
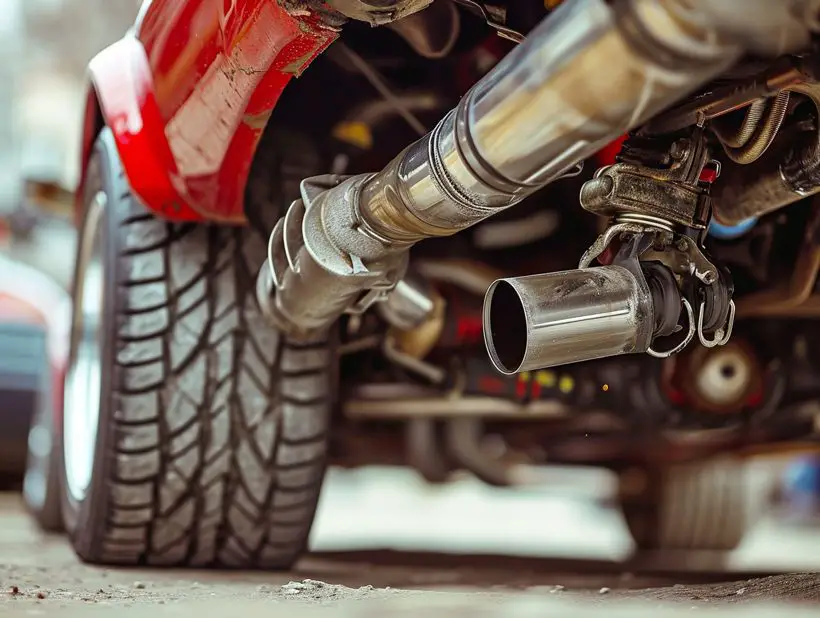
The first thing I do is safely elevate the car. Once I’ve ensured the vehicle is completely secure on jack stands, I slide underneath with a flashlight in hand. You’ll want to look along the exhaust system which runs from the front to the back of your car. The heat shields are the metal guards that surround various parts of the exhaust to dissuade heat from damaging other components.
Visual Inspection:
- Check for any obvious signs of looseness, like a shield hanging lower than usual or missing bolts.
- Inspect the condition of clamps or retaining hardware that may have deteriorated over time.
Auditory Check:
- Tap lightly on each shield using a tool. The one responsible for the rattle will typically produce a hollow sound and may visibly move.
During this inspection phase, I take note of the heat shield’s condition. If it’s severely corroded or damaged, clamps or repair tape might not offer a lasting solution. In that case, replacement becomes necessary.
Remember, the exhaust can get quite hot even after a short drive so it’s essential to let it cool down before touching any parts. And always keep in mind that some shields are located near sensitive components like brake lines or fuel tanks. Approach the task with the utmost caution to avoid any risk of injury or damage.
By following these steps, I’m able to quickly locate the loose component responsible for the noise. Once identified, I can move on to securing it in place or assessing whether it requires a more comprehensive fix. With the right approach, tackling a rattling heat shield is a manageable task that can restore peace and quiet to your rides.
Securing the Heat Shield
Once I’ve pinpointed the culprit behind the rattling noise, it’s time to get my hands dirty and secure the heat shield back into place. Safety always comes first, so I make sure the car is cool and securely propped up on jack stands before I slide underneath.
Here are the steps I follow to make sure the heat shield is fastened tightly:
- Identify Broken Fasteners: Visually check the clamps and screws holding the heat shield. I often find that corrosion or vibration has caused them to fail.
- Remove Damaged Components: I carefully remove any broken hardware with the appropriate tools. If screws are seized, a penetrating oil does the trick to loosen them.
- Clean Mounting Surfaces: Dirt and rust can prevent a secure fit so I clean off any debris from the heat shield and its mounting points.
- Install New Hardware: I always replace old clamps and screws with new, high-quality fasteners, ensuring they’re the correct size and type.
- Tighten Securely But Don’t Over-Torque: By using a torque wrench, I snug the fasteners enough to hold the shield firmly but not so tight that they strip or break.
If the heat shield itself is damaged, I consider a few options:
- Straightening: If it’s simply bent, I’ll gently hammer it back into shape using a rubber mallet.
- Welding: For small holes and tears, a quick weld can patch things up, though I make sure I’m working in a well-ventilated area.
- Replacement: In case of extensive damage, fitting a new heat shield might be the most straightforward solution.
To ensure the repair holds up over time, I take the car for a short drive to see if there’s any noticeable difference in the rattle. The heat shield should stay in place if everything’s done right, effectively silencing that annoying exhaust noise. However, if the rattle persists, I might’ve missed an additional loose spot or there could be another issue at play. Therefore, I keep a close ear out for any unusual sounds that might indicate further investigation is needed.
Alternative Fix: Removing the Heat Shield
Sometimes, the most straightforward solution to a rattling heat shield is simply to remove it. Although it’s not commonly recommended due to the protective role it plays, there are scenarios where this could be the best course of action. Here’s a walk-through of how to properly remove a heat shield that‚Äôs beyond repair.
First things first, I’ll gather all the tools needed to safely remove the shield. This typically includes:
- A set of socket wrenches
- Protective gloves
- Safety goggles
After parking on a flat surface and properly engaging the parking brake, I elevate the vehicle using a jack and steady it with jack stands. It’s critical to ensure the car is stable before getting underneath it. Now, I don my protective gear and slide under the vehicle to access the heat shield.
Once I’m in a comfortable position, I inspect the heat shield to locate all the fasteners. Heat shields are often held in place with bolts or screws, so I use my socket wrench to loosen them carefully. Rust can make this a challenge, and there might be a need to apply penetrating oil to ease the process.
After removing all the fasteners, the heat shield should come off relatively easily. I gently remove it, ensuring not to disturb other components in the exhaust system. If any part of the shield is stuck due to corrosion or deformation, a rubber mallet can be used to carefully tap it loose.
However, it’s vital to consider a few things before finalizing the removal:
- Environmental Impact: The heat shield serves a purpose; without it, the exhaust system emits more heat which can affect nearby components or even the road surface.
- Safety Concerns: Without the shield, the extremely hot exhaust could pose a risk of burns during maintenance or if someone inadvertently touches the area.
With the heat shield off, I take the opportunity to inspect the exhaust system for any other issues that might need addressing. It’s also a good time to consider whether a replacement shield is a necessity based on the vehicle’s condition and my driving needs.
By now, it’s clear that while driving without a heat shield is not ideal, sometimes it’s a practical temporary fix until a more permanent solution is found. Remember, the ultimate goal is to maintain the vehicle in a safe, functioning state without compromising on its performance and longevity.