
Knowing how to test your car battery is a key part of maintaining a reliable vehicle. We’ve all faced that dreaded moment when the car won’t start, and often, it’s due to a weak or dead battery.
We’re here to walk you through the simple steps to check your battery’s health, ensuring you’re never left stranded. It’s a quick process that can save you time and money down the road.
By keeping an eye on your battery’s condition, you’ll extend its life and improve your car’s overall performance. Let’s dive into how you can assess your car battery’s health with ease.
Step 1: Gather the necessary tools and equipment
Before we delve into the testing process, it’s crucial that we have all the necessary tools at hand. Ensuring we’re fully prepared can not only streamline the battery-checking procedure but also grant us peace of mind as we go through the steps. Here’s what we’ll need:
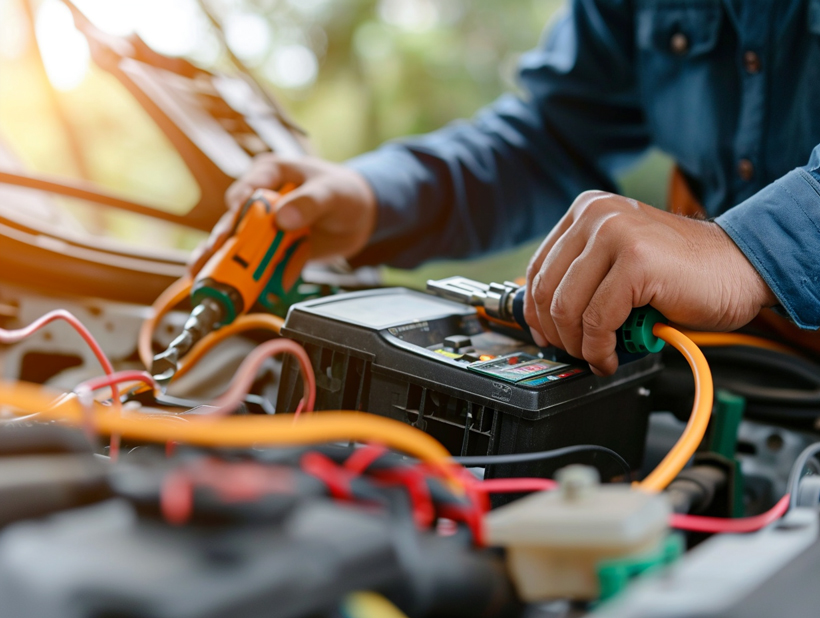
- A Digital Multimeter: This is essential for measuring the voltage of our car battery. It gives us a clear, accurate reading and helps us determine if our battery is holding the charge it needs to start our vehicle.
- Safety Gear: Batteries contain sulfuric acid and produce explosive gases. We should always use protective gear, such as safety glasses and gloves, to prevent any accidents.
- A Car Battery Load Tester: While optional, it can provide a more comprehensive test, measuring the battery’s ability to deliver power under load.
- A Clean Cloth: To wipe off any corrosion or dirt from the battery terminals.
- A Wire Brush or Battery Terminal Cleaner: This tool will help us clean the terminals properly, ensuring a good connection. Corrosion can interfere with the results, so it’s vital to start with clean terminals.
- Battery Terminal Protector: After cleaning, applying this protector helps prevent future corrosion.
By assembling these tools beforehand, we ensure that we’re equipped to accurately assess the condition of our car battery. Given the importance of a reliable battery, taking the time to prepare properly is a step that cannot be underestimated. We’ll use these tools in the subsequent steps to effectively check the health of our battery and to tackle any issues we may uncover.
Remember, safety first. Always check the manufacturer’s instructions for your specific vehicle before attempting to test the battery. Each car may have its own set of precautions or recommended testing methods, and it’s our responsibility to be thoroughly informed.
Step 2: Park your car in a safe location
Before we dive into the nitty-gritty of checking our car battery, ensuring safety is paramount. We should park our car in a safe location, preferably on a level surface and away from traffic. It’s essential to make sure that the vehicle is in a stable position to prevent it from rolling or moving during the testing process.
- Turn off the engine and remove the keys from the ignition.
- Engage the parking brake to secure the vehicle.
- Ensure the gear is in ‘Park’ or ‘Neutral’ for an automatic or manual transmission, respectively.
Adequate Lighting is crucial for visibility. If it’s dark, we might need a portable light or a flashlight. We must be able to see the battery clearly to assess any physical damage, corrosion, or leakage. Good illumination helps us conduct a safe and accurate test.

Another critical step is to allow our car to cool down before proceeding. Given that engine components and the battery itself can become quite hot, waiting for about 30 minutes after the last engine use would be wise. This cooling-off period helps prevent burns or other accidents that can occur from touching hot surfaces.
We also want to make note of the surroundings. A well-ventilated area will prevent the accumulation of potentially explosive gases that the battery emits. It’s best to avoid enclosed spaces like garages unless they are well-ventilated.
Checking the car’s manual for any specific guidelines related to the make and model is a good practice. Certain vehicles may have additional steps or precautions that we should follow.
By preparing our workspace with these precautions and settings in mind, we’re setting ourselves up for a successful and safe battery testing process. Now that our car is securely parked and the surroundings are in check, we can move on to the next steps without worrying about our safety or the safety of others.
Step 3: Turn off the engine and open the hood
After ensuring all safety precautions are in place, it’s time to progress to the next step. With our car parked in a secure spot and the parking brake engaged, we turn off the engine to prevent any electrical injuries or shorts. This action ensures our safety and protects the vehicle’s electrical systems. With the engine off, we proceed by locating the hood release lever, usually found under the dashboard on the driver’s side.
Once we find the lever, we give it a firm pull to disengage the hood latch. Some vehicles may require us to press down on the hood or lift it slightly to release the secondary safety latch. We then secure the hood with the built-in prop rod or, if our car is equipped with them, the automatic support struts.
Preparing for Inspection
Before we can inspect the battery, it’s essential that we do a visual check for any obvious signs of damage. Here’s what we’re looking out for:
- Cracks or bulges on the battery case
- Corrosion around the terminals
- Loose or damaged cables
These signs could indicate potential problems, and if any are present, utmost care is advised. Address these issues promptly to avoid further complications.
Accessing the Battery
In some cases, accessing the battery might require us to remove a plastic cover or a metal bar. We should consult our car’s manual to understand the specifics of our model. As we approach the task, it’s key to remember to always use the right tools. This not only makes the job easier but also ensures we don’t cause unnecessary damage. With the battery now visible, we’re prepared to proceed to the testing phase.
Battery Terminals
Next, we examine the battery terminals, looking for any signs of corrosion. Clean terminals are crucial for a proper connection and accurate test results. If there is corrosion present, we’ll clean it off using a mixture of baking soda and water or a commercial battery cleaning solution. After cleaning, we make sure the terminals are dry before connecting the tester.
Battery Tester Connection
Step 4: Inspect the battery for any visible damage
Once we’ve ensured our safety and accessed the battery, it‚Äôs time to meticulously inspect it for any signs of physical damage. Identifying visible issues can save us time and prevent the misinterpretation of test results later on.

Here are key aspects to look out for:
- Cracks or Bulges: These can be signs of a failing battery. Heat, overcharging, or an internal short can cause the case to warp.
- Signs of Leakage: Any wetness or corrosion around the battery could signal a leak, which might lead to a drop in performance or failure.
- Discoloration: Unusual colors on the battery case can be indicative of overheating.
While examining, make sure that the battery is securely mounted. A loose battery can be prone to vibration damage which shortens its lifespan.
Terminal Check
Battery terminals are critical points of connection between the battery and the car‚Äôs electrical system. We’ll take a moment to scrutinize these:
- Corrosion Presence: A crusty, white, or greenish substance on the terminals needs cleaning as it hinders the flow of electricity.
- Tightness of Connections: The terminals should be snug. Any looseness might interrupt power supply.
- Terminal Damage: Look for any cracks or breaks that could indicate a need for replacement.
Checking the Battery Case
The condition of the battery case gives us a clue about the battery’s health:
- Swelling or Deformation: A swollen battery case often means exposure to excessive temperatures.
- Sticker and Date Code Integrity: The sticker on the battery indicates its age. Batteries over five years old could be near the end of their serviceable life.
Visual Summary
To recap, here’s a quick visual summary of our inspection points:
| Inspection Item | What to Look For |
|---|---|
| Case | Cracks, bulges, discoloration |
| Leakage | Wetness or corrosive substances |
| Mounting | Stability and secure positioning |
| Terminals | Corrosion, tightness, and overall condition |
| Battery Case Deformation | Swelling or other shape irregularities |
| Sticker and Date Code | Legibility and age of the battery |
Step 5: Test the battery voltage using a multimeter
After inspecting the battery for any physical signs of damage, it’s time to test the actual voltage. A multimeter is our go-to tool for this job, and here’s how we do it:
- Set the Multimeter: First, set your multimeter to the 20 volts setting since car batteries are typically 12 volts.
- Connect the Leads: Attach the multimeter’s red lead to the positive battery terminal and the black lead to the negative terminal. It’s crucial to ensure good contact for an accurate reading.
- Read the Voltage: Once connected, the multimeter will display your car battery’s current voltage.
For most cars, a healthy battery should have a voltage reading between 12.4 and 12.7 volts. If our measurement falls within this range, it indicates that the battery is in good condition. However, different readings could suggest various states of charge or potential battery issues:
| Voltage Reading (V) | State of Charge | Condition |
|---|---|---|
| 12.7 – 13.2 | Fully charged | Good |
| 12.4 | 75% charged | Acceptable |
| 12.0 | 50% charged | Charge needed |
| 11.8 or less | Discharged | Charge necessary/replace |
Should our multimeter show any reading below 12.4 volts, we’ll know it’s time for further action, possibly charging the battery or, if the situation calls for it, replacing the battery altogether.
In contrast, if we notice a higher voltage, typically around 13.7 to 14.7 volts, when the engine is running, this indicates that the alternator is charging the battery adequately. It’s always a good practice to compare our readings with the specifications outlined in the vehicle’s manual, as some variations are to be expected across different models and brands.
Testing the battery voltage with a multimeter is a simple yet effective way to check the battery’s health. Armed with this knowledge, we can maintain our vehicle’s reliability and prevent unwanted surprises, ensuring our car is always ready to perform when needed.
Step 6: Interpret the multimeter reading
After measuring your car battery’s voltage, it’s vital to know what those numbers mean. Interpreting the multimeter reading gives us insight into the battery’s health and if any corrective action is necessary. Let’s break down what various voltage readings indicate.
For a standard 12-volt car battery:
- 12.6 volts or above: Your battery is healthy and fully charged.
- 12.4 ‚ 12.6 volts: The battery is in a good state but may need a charge soon.
- 12.2 ‚ 12.4 volts: It’s at a moderate charge level, but it’s typically sufficient to start your engine.
- Below 12.2 volts: Your battery is discharged and might be at risk of failing.
| Voltage Reading | State of Charge |
|---|---|
| 12.6V + | Fully Charged |
| 12.4V – 12.6V | Good |
| 12.2V – 12.4V | Moderate |
| Below 12.2V | Discharged |
Should the voltage read below 12.2 volts, it’s a clear signal to either charge your battery or consider having it tested further for potential issues. Nonetheless, a car battery can show a good voltage while still being faulty. It’s due to the inability of voltage tests to assess a battery’s ability to hold a charge under load conditions.
To thoroughly evaluate whether the battery can perform under the stress of actual use, we turn to a load test. This process is a bit more intricate and requires specific equipment that places an artificial load on the battery replicating the normal starting load. It’s such an effective means to witness firsthand how your battery fares under typical operating conditions.
Understanding the voltage readings not only helps us keep tabs on our battery’s health but also guides us in making informed decisions regarding maintenance or replacement before we’re left stranded. It’s a fundamental part of responsible car ownership and upkeep.
Step 7: Perform a load test on the battery
After checking the voltage, it’s essential to perform a load test. This will give us insight into how the battery performs under stress, which is a better indicator of its health than voltage alone.
Conducting a proper load test involves a few critical steps:
- Ensure the battery is fully charged. If it’s not, charge it beforehand.
- Turn off all accessories. This includes lights, radio, and air conditioning.
- Connect a battery load tester. This device simulates the electrical draw of starting an engine.
When we conduct the load test, we’re looking for the battery to maintain a voltage above 9.6 volts at 15 seconds when under the load. This would mean the battery is in good working order. Should the voltage drop below this threshold, the battery may be weak or failing.

Here’s a simple reference for what the load test can indicate:
| Voltage (Under Load) | Battery Condition |
|---|---|
| Above 9.6 volts | Healthy Battery |
| 9.1 – 9.5 volts | Weak Battery |
| Below 9.1 volts | Failing Battery |
Remember, if we’re in doubt about interpreting these results, it’s always best to consult with a professional mechanic. They have the expertise to provide a comprehensive diagnosis of the battery’s condition.
Additional tips for an effective load test:
- Warm up the battery tester before use to get more accurate results.
- Inspect the battery for any signs of damage before the test. Any cracks or bulges could indicate a safety risk.
Performing a load test is crucial for checking a battery’s health, especially before embarking on long trips or in extreme weather conditions. It gives us confidence in our vehicle’s ability to start and run reliably.
Conclusion
We’ve walked you through the necessary steps to ensure your car battery’s health is up to par. Remember, regular checks using a multimeter can save you from unexpected breakdowns and maintain your vehicle’s reliability. Don’t ignore the signs of a weakening battery. If your readings fall below the optimal range, it’s time to take action. Whether it’s recharging or replacing, addressing battery issues promptly will keep you on the road and stress-free. Trust your tools, understand the readings, and when in doubt, always seek professional advice for a thorough battery assessment. Your car’s performance depends on it, and we’re here to make sure you’re equipped with the knowledge to keep it running smoothly.