A car’s engine is a complex system that requires proper cooling to operate efficiently by keeping the engine cool. For efficient cooling, it uses a coolant that is constantly circulating for optimal cooling. But sometimes, coolant doesn’t circulate properly for reasons.
Common causes include a damaged water pump, a clogged radiator, or a failed thermostat. The coolant may also stop circulating if leaks and air are in the system. A clogged heater core and low coolant levels may also cause the problem.
This article will discuss the importance of proper coolant circulation and how to diagnose coolant circulation problems. We will also tell you the common causes and solutions. Ultimately, we will give you preventive tips to avoid coolant-related problems.
The Importance of the Proper Circulation of Coolant in the Cooling System
Keeping proper circulation of coolant is vital for the following reasons:
- Regulates engine temperature: A thermostat controls the coolant flow according to the engine temperature and opens or closes accordingly.
- Enhances engine performance: The proper circulation of coolant ensures the engine operates at its optimal temperature range.
- Increases efficiency: An engine at the right temperature requires less fuel.
- Reduces emissions: Another importance of coolant circulation is reducing emissions. A cooler engine burns fuel more completely and produces less carbon monoxide, hydrocarbons, and nitrogen oxides.
- Extends engine life: By keeping the engine at a stable temperature, the cooling system ensures that the engine runs smoothly and reliably. It also acts as a lubricant and a corrosion inhibitor for the engine cooling parts.
- Improves vehicle safety: Cooling prevents overheating. Hence, it reduces the risk of engine failure, fire, or explosion. The coolant also reduces emissions, protecting the environment and human health.
Common Causes of Coolant Circulation Problems
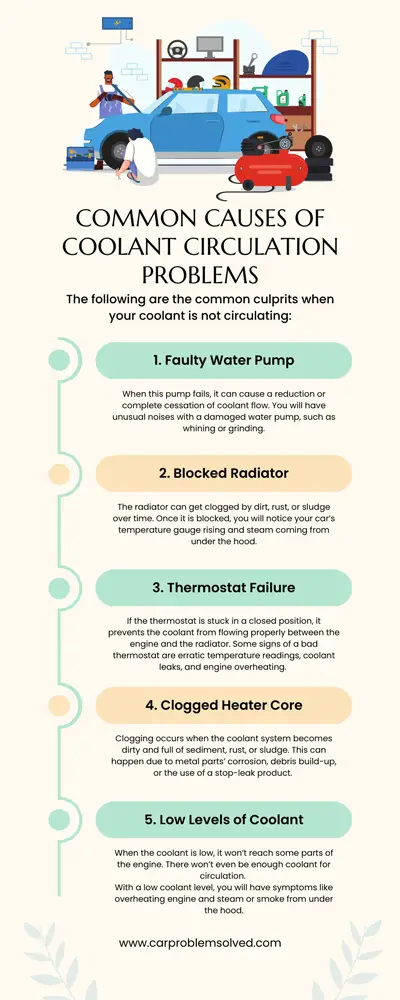
The following are the common culprits when your coolant is not circulating:
1. Faulty Water Pump
When this pump fails, it can cause a reduction or complete cessation of coolant flow. You will have unusual noises with a damaged water pump, such as whining or grinding. The noises indicate that the bearings are wearing out.

2. Blocked Radiator
The radiator can get clogged by dirt, rust, or sludge over time. Once it is blocked, you will notice your car’s temperature gauge rising and steam coming from under the hood. You will also have a sweet smell of antifreeze and brown or black sludge inside the radiator.
3. Thermostat Failure
If the thermostat is stuck in a closed position, it prevents the coolant from flowing properly between the engine and the radiator. Some signs of a bad thermostat are erratic temperature readings, coolant leaks, and engine overheating. On top of these, you will have poor fuel economy and reduced engine performance.
4. Clogged Heater Core
Clogging occurs when the coolant system becomes dirty and full of sediment, rust, or sludge. This can happen due to metal parts’ corrosion, debris build-up, or the use of a stop-leak product.
Debris blocks the passages in the heater core, preventing the hot coolant from reaching it. Symptoms of a clogged heater core include a lack of heat from the heater and a sweet-smelling odor from the vents.
5. Low Levels of Coolant
When the coolant is low, it won’t reach some parts of the engine. There won’t even be enough coolant for circulation.
With a low coolant level, you will have symptoms like overheating engine and steam or smoke from under the hood.
Diagnosing Coolant Circulation Problem
You can diagnose this issue by:
1. Checking the Radiator and Hoses
The radiator is the main component of the cooling system that dissipates heat from the coolant. The hoses connect the radiator to the engine, allowing the coolant to flow.
To check the radiator and hoses, wait until the engine is cool and open the hood. Look for any signs of leaks, cracks, corrosion, or damage on the radiator and hoses. You can also use a pressure tester to check for leaks in the system.
To diagnose air inside the hoses, look for any signs of bubbling or gurgling noises in your radiator. You can also squeeze your upper radiator hose and feel for any air resistance.
2. Inspecting the Water Pump
The water pump is responsible for pumping the coolant through the system. This component is driven by a belt or a chain from the engine.
Locate it on your vehicle and look for any signs of leaks, noise, wear, or damage. Check if the serpentine belt or chain is tight and in good condition.
3. Checking the Thermostat
The thermostat is a valve that regulates the coolant flow according to the engine temperature. It is usually located near the engine or on the upper radiator hose.
To diagnose the thermostat, you must start your vehicle and let it warm up. You will then use an infrared thermometer to measure the temperature of both radiator hoses.
If both hoses are hot, the thermostat is open and working properly. If one hose is cold and the other is hot, the thermostat is stuck closed, preventing coolant circulation. If both hoses are cold, the thermostat is stuck open. As such, it is allowing too much coolant circulation.
4. Inspecting the Heater Core
The heater core is a small radiator that provides heat to your cabin. It is connected to your cooling system by two hoses carrying the hot coolant to your engine. To diagnose it, start your vehicle and turn on your heater.
When the engine is warm, feel both heater hoses for temperature and flow. Both hoses should be hot and have a good flow. If one hose is cold and the other is hot, your heater core is clogged, preventing coolant circulation. If both are cold, your heater core is not receiving enough coolant.
5. Checking Coolant Levels
Wait until your engine is cool, and then open your hood. Look for your coolant reservoir. Check if it has enough coolant between the minimum and maximum lines. You should also check your pressure cap for any signs of damage or wear.
Solutions for Addressing Coolant Circulation Problems

To have the coolant circulating, follow these:
1. Replacing the Water Pump
- Step 1: Drain the coolant from the system and remove the hoses attached to the water pump.
- Step 2: Next, remove the bolts that secure the engine block’s water pump and remove the old water pump.
- Step 3: Replace it with a new one and install new gaskets as needed.
- Step 4: Tighten the bolts to the manufacturer’s specifications and reattach the hoses.
2. Cleaning or Replacing the Radiator
To clean the radiator-
- Step 1: Start by turning off the engine and letting it cool down completely to clean.
- Step 2: Remove the radiator cap and use a flush solution to clean the radiator.
- Step 3: Follow the instructions on the flush solution to clean the radiator.
- Step 4: Drain the solution from the radiator and flush it with clean water.
If the radiator is damaged, it needs to be replaced. To replace it,
- Step 1: Drain the coolant from the system and remove the attached hoses.
- Step 2: Unbolt the radiator and remove it from the vehicle.
- Step 3: Replace it with a new radiator and install new gaskets as needed.
- Step 4: Reattach the hoses you removed.
3. Fixing the Thermostat
To fix the thermostat issue, you have to replace it.
- Step 1: Start by draining the coolant from the system.
- Step 2: Remove the housing that holds the thermostat.
- Step 3: Uninstall the old thermostat and install a new one, ensuring it is installed correctly.
- Step 4: Reinstall the housing.

4. Fixing Leaks and Removing Air from the System
For fixing leaks, locate the source of the leak. It may be a loose hose clamp, a damaged hose, or a damaged gasket. Tighten or replace any parts that are causing the leak.
Locate the bleeder valve on the engine to remove air from the system and open it. Run your engine until the air bubbles stop coming out of the valve, then close it.
5. Flushing or Replacing the Heater Core
To flush a heater core,
- Step 1: Disconnect the hoses that are attached to the heater core.
- Step 2: Flush it with a radiator flush solution and run the engine for the recommended time on the product instructions.
- Step 3: Drain the solution and flush it with water.
If the heater core is damaged, it may need to be replaced.
- Step 1: Start by removing the hoses that are attached to the heater core.
- Step 2: Unscrew any screws or bolts that hold it in place.
- Step 3: Replace the old heater core with a new one and reattach the hoses and screws.
6. Refilling the Coolant
Ensure the engine is cool. Then locate the coolant reservoir, usually a clear plastic tank near the radiator. If the coolant level is low, use a funnel to pour the coolant into the reservoir until it reaches the maximum level.
Preventive Maintenance Tips for Avoiding Coolant-Related Problems

Follow these tips to have your cooling system in the best condition always:
1. Regular Maintenance
Follow the manufacturer’s scheduled maintenance. Also, be replacing worn parts, such as belts and hoses. Don’t forget to be checking the coolant level regularly.
2. Coolant System Checks
Visually inspect the cooling system for any signs of leaks or damage. Check for cracks, holes, debris, or corrosion. This should be done regularly, especially before long trips.
3. Monitoring Temperature Gauge
This will help you detect any potential cooling system problems early. Pay attention to when the gauge shows an abnormal reading, such as an increased temperature. This will indicate a problem with the system that needs attention.
4. Flushing the Cooling System Periodically
Drain the old coolant and replace it with fresh coolant occasionally. This helps to remove any dirt, debris, or contaminants that may have accumulated in the system.
If not flushed, they can cause blockages and affect the system’s efficiency. Flustering the cooling system at least every two years is recommended or as stipulated in your manual.
If you’re experiencing issues with coolant circulation in your car, it’s important to address the underlying problem to prevent potential engine overheating and damage. Our article on why does my engine coolant keep disappearing explores common causes for coolant loss and offers potential solutions to rectify the issue. Additionally, understanding the consequences of an overheating engine is crucial in maintaining the health of your vehicle. Our article on what happens when a car overheats provides valuable insights into the effects of engine overheating and the potential damages it can cause. By exploring these related topics, you can gain a better understanding of coolant issues and take appropriate measures to ensure the proper functioning of your car’s cooling system.Conclusion
Ensuring proper coolant circulation is crucial for optimal engine temperature and avoiding potential engine damage. Neglecting this aspect of your car’s maintenance can lead to costly repairs and downtime.
So, don’t wait until you have the tell-tale signs that your car’s coolant isn’t circulating properly. Perform regular maintenance on your cooling system, including checking the radiator, hoses, water pump, and thermostat.
Also, regularly monitor your car’s temperature gauge and address any issues immediately.