
Honda Odyssey has an above-average reliability rating and is among the top choice minivans. However, it’s known to have air conditioning problems. One of the problems is the Ac not working.
But what causes Honda Odyssey Ac not working problems? Some of the reasons the Ac on this vehicle may not be working include a faulty climate control unit and a leaking refrigerant. Blower motor problems are also known to cause these Ac issues.
The article provides a more in-depth understanding of the problems causing Ac problems and provides their solutions. Read on to learn all those.
Possible Reasons Why Honda Odyssey Ac is Not Working
Honda Odyssey is an eight-passenger car, and the worst scenario would be eight overheating people with no air conditioner to cool them. Most Ac problems in this vehicle involve the Ac not working effectively or not working at all.

Some of the reasons the Honda Odyssey Ac may not be working include;
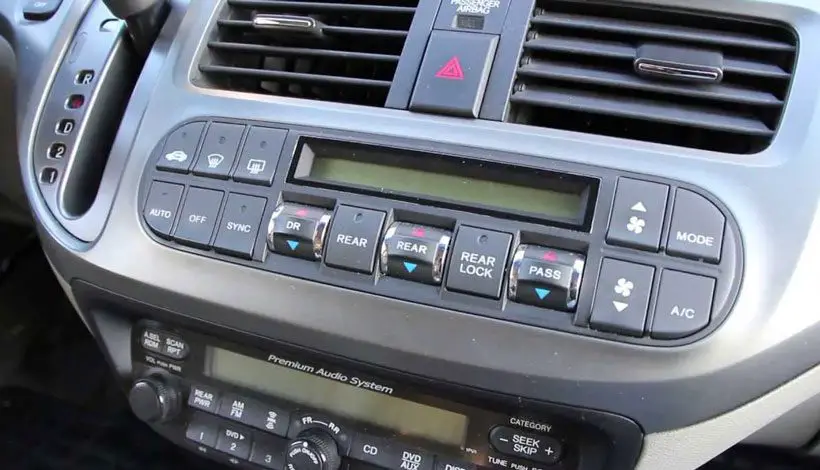
1. Climate Control System Problems
The climate control system allows the occupants to regulate the temperatures inside the car to their liking.
- However, electrical problems or malfunctions in the system can cause this system not to work effectively or not work at all.
- If your Ac system doesn’t respond, the climate control system may be the cause.
Solutions
The best solution to a failed climate control system is to replace them with a new one. While you can hire a mechanic to replace it, you can do it yourself and save some repair money. Follow the steps below to replace the climate control system on your own.
- Step 1: Depending on the model year, you may have to remove the panel on the passenger side. Use a dashboard remover tool to remove it.
- Step 2: Pull out the dashboard part with the Ac vents and climate control system with the dashboard tool
- Step 3: Disconnect connectors from the climate control panel
- Step 4: Using a screwdriver, unscrew the climate control system from the dashboard
- Step 5: Remove the faulty climate control system from the dashboard
- Step 6: Install the new climate control system to the dashboard and screw it in
- Step 7: Connect the connectors to the new climate control system
- Step 8: Put back the dashboard and ensure all the clips are back in
- Step 9: Re-install the passenger side panel if you removed it
The Honda Odyssey climate control unit costs between $25 and $120 to buy, depending on the model. If you hire a mechanic, you will pay between $100 and $200.
2. Refrigerant Leak
The refrigerant is responsible for cooling the air before it flows through the vents into the car.
- Due to high pressure, the refrigerant may leak through tiny holes in the pipe or O-rings.
Low refrigerant is responsible for the issue of the Ac not blowing cold air. User Main Rock had a problem with the vehicle not cooling, and low refrigerant due to a leak was the cause.

Solutions
The solutions include replacing the O-rings and replacing any damaged hoses. You will also need to recharge the refrigerant. Follow the steps below to recharge the refrigerant.
- Step 1: First, check the minimum and maximum refrigerant requirements. The information is usually in the user manual or under the hood
- Step 2: Turn on the vehicle and the Ac
- Step 3: Open the low-pressure port on the car and connect the dispenser from the recharge kit
- Step 4: Add refrigerant while observing its pressure on the recharge kit’s gauge
- Step 5: When done, remove the recharge kit hose from the port and replace the cap
- Step 6: Close the hood
The following video shows how to recharge the Honda Odyssey refrigerant
Replacing the Honda Odyssey refrigerant and repairing the leaking points cost between $250 and $350.
Replacing a leaking O-ring can be done when replacing the hoses. Most times the leak is on the Ac compressor side due to high pressure. Follow the steps below to replace a leaking O-ring and hose.
- Step 1: Drain the refrigerant off the system
- Step 2: Jack the vehicle enough to get underneath it
- Step 3: Using a torque wrench unscrew the bolt that holds the hose onto the compressor
- Step 4: Remove the ac line on the expansion valve
- Step 5: Remove the old Ac line
- Step 6: If the new Ac line comes with O-rings, proceed to install it.
- Step 7: If the new Ac line doesn’t have the O-rings, install them by sliding them over the end.
- Step 8: Connect the new Ac line back to the expansion line
- Step 9: Connect the other end to the condenser and screw it back in
- Step 10: lower the vehicle and refill the refrigerant to test the new hoses and O-rings.
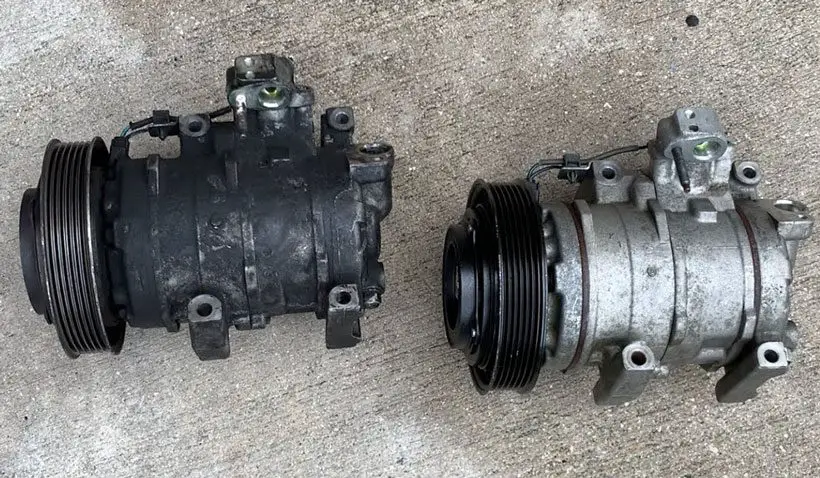
3. Ac Compressor Problems
The compressor pressurizes the refrigerant before it flows to the condenser. This power unit fails for many reasons, including low refrigerant, which allows it to overheat.
Clogs in filters and the condenser can also cause the compressor to fail. This air conditioning system part is usually responsible when the vehicle blows in warm air and sometimes makes rattling noises.
Solutions
Replacing the compressor is usually the best fix when it develops problems. However, this process is energy and time-consuming, and it’s best to hire a mechanic to take care of it.
However, if you have time and a little experience, you can attempt to replace the compressor. Follow the steps below
- Step 1: Open the vehicle hood
- Step 2: Empty the Freon off the system
- Step 3: Unclip the reservoir to move it off the way
- Step 4: Use a 14-millimeter socket to remove the serpentine belt
- Step 5: Jack the vehicle up high enough to slip underneath it
- Step 6: Disconnect the wire for the Ac compressor clutch
- Step 7: Remove the bolts from the Ac compressor using a 10-millimeter socket to loosen the hoses and pull them out
- Step 8: Use a 12-millimeter socket to remove the bolts holding the Ac compressor in place
- Step 9: In most models, it’s hard to remove it from below. You can loosen two bolts from the suspension connecting to the vehicle frame
- Step 10: Install the new one and connect all the bolts
- Step 11: Replace the hoses and reconnect the reservoir
The video below should help you when removing the compressor from your Honda Odyssey.
A mechanic may cost you between $800 and $1,200 to replace the compressor, with half of the money going into labor.
4. Blower Motor Issues
The blower motor controls the speed at which the air flows through the vent as controlled by the climate control unit. Due to electrical problems, the blower motor may cease to work or underperform.
The blower motor is usually responsible when the car takes time to cool. One user on the OdyClub forum had the blower not working, and the vehicle could not blow any air.
Solutions
To solve the blower motor problems, you should replace it with a new one. Follow the steps below;
- Step 1: Remove the panel below the passenger-side glove box compartment
- Step 2: Remove the connector connected to the panel
- Step 3: Remove the connector to the blower motor
- Step 4: Use a flathead screwdriver to remove the four bolts holding the blower motor
- Step 5: Pull out the blower motor
- Step 6: Put back the new blower motor
- Step 7: Install the screws in place
- Step 8: Plug in the blower motor connector
- Step 9: Plug in the under-panel connector and put it back on
The video shows how to replace the heater blower motor on Honda Odyssey
If changing the blower motor doesn’t fix the problems, the blower motor resistor may be faulty. A blower motor resistor can cause problems where the Ac only works on high. Follow the steps below to replace it.
- Step 1: Open the panel below the passenger-side glove box compartment
- Step 2: Locate the blower motor resistor
- Step 3: Disconnect the connector connected to the resistor
- Step 4: Unscrew the resistor and remove it
- Step 5: Connect the new resistor and screw it in
- Step 6: Reconnect the connector to the new resistor
- Step 7: Put back the under-panel
This repair can cost you between $350 and $450 labor costs included
5. Dirty Ac Air Filter
The air filter removes dirt and contaminants from the air blown into the cabin. With time the air filter gets too dirty to let enough air through, causing reduced cooling.
Solutions
While cleaning the air filter is a possible solution, it’s often better to replace it. Replacing the filter improves the cooling immediately and gives you more time before it gets dirty.
Follow the steps below to remove the air filter from your Honda Odyssey
- Step 1: Open the glove box on the passenger’s side of the vehicle, and release the damper.
- Step 2: Press the sides of the glove box to remove it to see the cabin air filter cover.
- Step 3: Press the tabs on the sides of the cover and pull to remove it
- Step 4: Pull out the cabin air filter and replace it with the new one
- Step 5: put back the filter door
- Step 6: Put the glove box back in and connect the damper
- Step 7: Close the glove box
Replacing the air filter can cost you under $50 if you do it yourself and between $50 and $80, labor included.
6. Dirty Evaporator
The evaporator cools air blown by the blower motor before running through the vents into the car. However, dust, debris, and mold can clog the evaporator over time, restricting airflow.

Solutions
The solution to a dirty evaporator is cleaning it using an expanding foam cleaner. You can also prevent evaporator problems by turning off the ac and letting air run through the evaporator before switching off the vehicle. Follow the steps below to clean the evaporator on your Honda Odyssey.
- Step 1: Remove the air filter following the steps above
- Step 2: Jack up the vehicle so you can get under it
- Step 3: Locate the condensate drain, usually in the center of the van just above the exhaust pipe
- Step 4: Insert the injection tube from the cleaner into the condensate drain
- Step 5: Inject the product for about 20-30 seconds and then stop
- Step 6: Remove the injection tube and lower the car
- Step 7: Let the car seat for about two hours
- Step 8: Reinstall the air filter
- Step 9: Test the ac
Cleaning a dirty evaporator can cost you between $70 and $120, labor included.
7. Faulty Blend Door Actuator
The blend door actuator is controlled by climate control changing between fresh and cold air to match your desired temperature. Due to wear and tear, this motor may fail, causing Ac problems in your Honda Odyssey.
You can tell the blend door actuator is faulty when the ac is stuck on warm or cold. You may also hear tapping or knocking noises from under the dashboard. However, the actuator is the main cause of the ac blowing hot on one side and cold on the other.

Solutions
A faulty blend door actuator should be replaced with a new one. However, some have had luck repairing it by cleaning it with a soft material, like an ear band. Follow the steps below to replace it.
- Step 1: Switch off the car.
- Step 2: Locate the actuator under the driver’s side of the dash just beside the pedals.
- Step 3: Remove any component hindering you from accessing the actuator.
- Step 4: Disconnect the electric link.
- Step 5: Use a screwdriver to remove the screws holding the actuator.
- Step 6: Remove the actuator.
- Step 7: Install the new actuator and ensure the pegs go into the correct slides. The short peg goes into the white slide, and the long one on the black slide.
- Step 8: Screw the new actuator and replace any other part you removed earlier.
The cost of replacing the door lock actuator on your Honda Odyssey ranges between $180 and $220.
8. Defective Cooling Fan
Fans pull air into the vehicle, increasing airflow and providing air needed to cool it. They are more advantageous when the vehicle is stationary, meaning there’s not much air flowing through.
A blown fuse and a faulty relay are some of the causes of the fan failing. However, a faulty wire may also be the cause. When the fan is not working, the car engine overheats because of reduced cooling, affecting the air conditioning performance.

Solutions
The fan is repairable, but it’s best to replace it once it begins developing issues. Follow the steps below to replace the radiator fan on your Honda Odyssey. Before the process, allow the vehicle time to cool off.
- Step 1: Remove the radiator cover
- Step 2: Remove the front grill
- Step 3: Unscrew the bracket holding the radiator in place to loosen it.
- Step 4: Remove the Hood latch by unscrewing it and removing the power connector
- Step 5: Unscrew the coolant reserve tank and remove it
- Step 6: Remove the connectors to the fan. Some are only removable from below the vehicle.
- Step 7: Unscrew the fan from the radiator. Bottom screws can only be loosened from under the vehicle.
- Step 8: Pull out the condenser fan and then the radiator fan.
- Step 9: Install the new radiator fan then the condenser fan
- Step 10: Screw the fan to the radiator
- Step 11: Install all the connectors
- Step 12: put back the reservoir
- Step 13: Reinstall the hood latch
- Step 14: Tighten the bracket holding the radiator and reinstall the front grill
- Step 15: Put back the radiator cover
The cost of replacing the Radiator fan in the Honda Odyssey ranges between $650 and $800 labor costs included.
If you’re experiencing AC issues in your Honda Odyssey, you may also be interested in our article on Honda CR-V AC not working. This article provides valuable information on potential causes and solutions for AC problems in the Honda CR-V model. Additionally, if you’re facing starting issues with your Honda Civic, our article on Honda Civic won’t start but has power offers troubleshooting tips and possible solutions to address this issue.FAQs
Following are the frequently asked questions on Honda Odyssey Ac not working problems.
Fixing Honda Ac problems can take anywhere between 30 minutes and three hours for minor issues. However, some repairs, like removing the Ac compressor, may take longer to fix but are doable within a day.
The cost of fixing Honda Odyssey Ac problems is between $100 and $1,500, depending on the repair. You can also do the repairs and save yourself repair money.
Timely check-ups and parking your car under a shade are among the things that can help prevent most Honda Odyssey problems. Parking under direct sunlight causes pressure to build up in the system, causing leaks.
Final Thoughts
If your Honda Odyssey has air conditioner system issues, begin by diagnosing these causes. You can hire a professional to help you with diagnosis and repairs, or you can do it.
If your vehicle is still under warranty, some of these problems may be covered, saving you money. However, you may have to pay for repairs if your warranty doesn’t cover bumper-to-bumper or it’s expired.