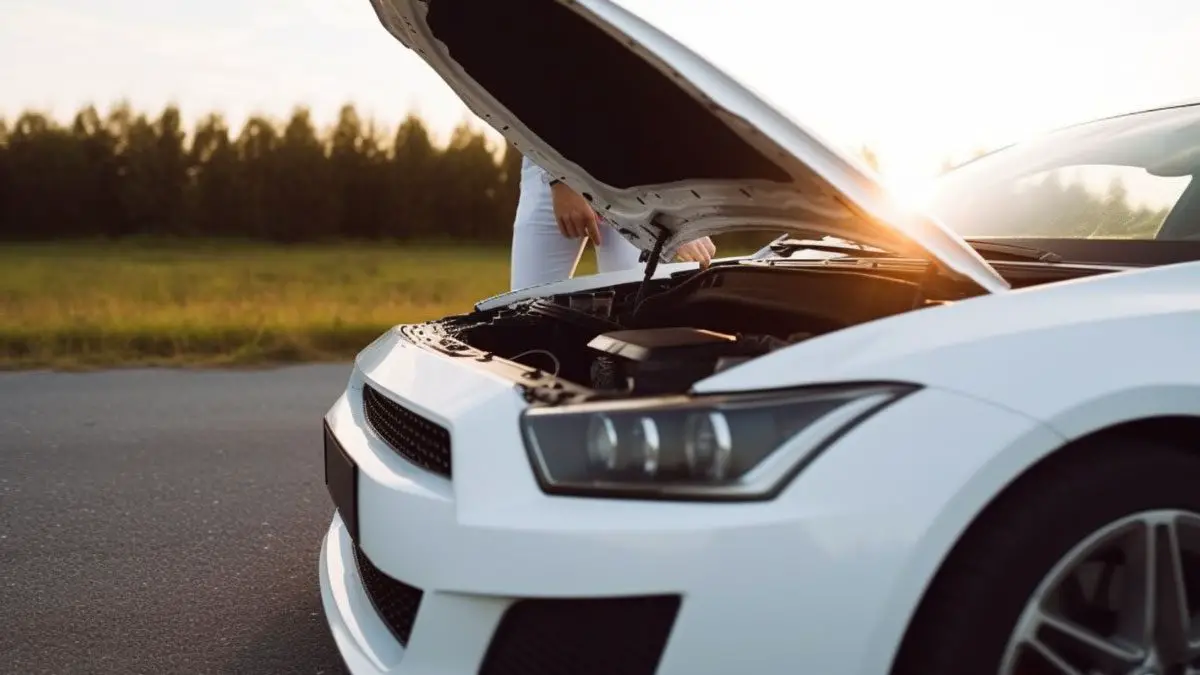
Boiling of coolant isn’t a normal case though it removes the excessive engine heat. If you don’t address this issue shortly, it may cause severe engine damage and unexpected accidents.
But why is my coolant boiling? It is usually the result of a faulty thermostat, clogged radiator, and damaged water pump. Besides, leaks in the coolant system cause low coolant levels, eventually boiling coolant.
In this article, we will discuss the causes and solutions of this issue. You can also learn how to prevent the problem from occurring. Thus, without further ado, let’s start.
The Importance Of Proper Temperature In Preventing Engine Overheating
Generally, the necessary energy for running a vehicle comes from the air-fuel mixture burning in the engine. When the mixture burns, a considerable amount of heat converts into energy.
And removing residual heat from the engine is necessary to prevent overheating. Otherwise, excessive engine overheating may cause a lack of lubrication and eventually damage the engine.

Generally, the cooling system of vehicles functions to remove this heat efficiently. In this system, coolant or antifreeze fluid absorbs the heat from the engine.
But to maintain its proper functioning, you need to control the coolant temperature. Because if it also overheats, it won’t be able to prevent the engine from overheating.
Normally, most of the coolant fluid of vehicles has a boiling point of approximately 300°-400°F. Also, the coolant starts boiling or gets frozen due to extreme weather.
Freezing the coolant hampers the coolant circulation and heat removal from the engine. Also, boiling coolant is incapable of removing heat from the engine.
Ways Of Diagnosing Coolant Boiling
Boiling of coolant may cause overheating of the engine, and sometimes white smoke comes from the exhaust. You can diagnose this issue quickly by:
1. Monitoring Temperature Gauge
Your car’s temperature gauge will show a reading around 195°-225°F as the average temperature of the car’s engine. But if the indicator shows unusual reading, it will indicate issues with the car cooling system.
2. Checking Coolant Level
You can check the coolant level of your car’s radiator to make sure it’s not too low. For this, you need to open the car’s hood and search for the coolant tank.
Usually, you can ascertain the level of coolant in the tank from outside. If the coolant level is low, there is a high chance that the coolant is boiling.
3. Inspecting The Radiator
If you open the hood of your car, you can find the radiator in front of the engine. You should check whether dust and debris block the passage path for water circulation. Alongside this, checking the radiator caps is also necessary.
Common Causes Of Coolant Boiling
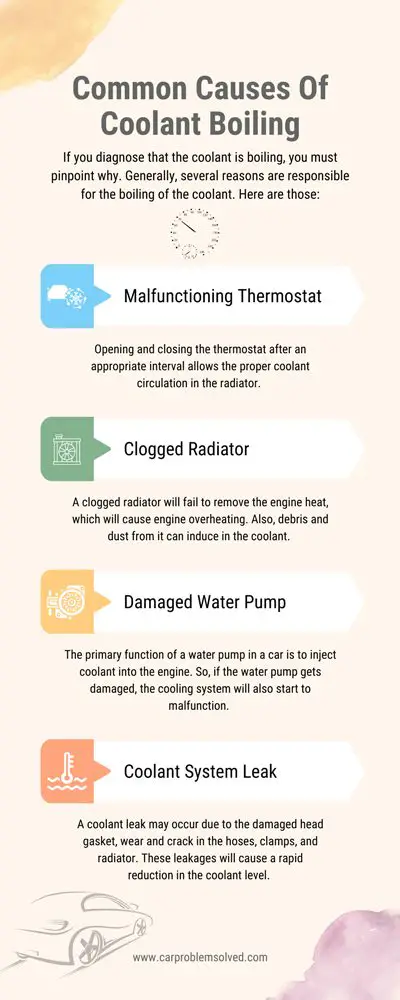
If you diagnose that the coolant is boiling, you must pinpoint why. Generally, several reasons are responsible for the boiling of the coolant. Here are those:
Malfunctioning Thermostat
Opening and closing the thermostat after an appropriate interval allows the proper coolant circulation in the radiator. A malfunctioning thermostat may stick in the “open” or “close” position and cause the overheating of the coolant and engine, respectively.
Either way, the coolant will boil upon crossing the boiling point. Also, sometimes, it may fail to open or close at the exact time. This will also lead to the overheating and boiling of the coolant.
Clogged Radiator
A clogged radiator will fail to remove the engine heat, which will cause engine overheating. Also, debris and dust from it can induce in the coolant.
These impurities within the oil may reduce the boiling point of the coolant. Eventually, it will result in overheating and boiling of the coolant.

Damaged Water Pump
The primary function of a water pump in a car is to inject coolant into the engine. So, if the water pump gets damaged, the cooling system will also start to malfunction.
Due to the insufficiency of the coolant supply, the engine temperature will reach an extremely hot level. This overheating will cause the overheating and boiling of the coolant.
Coolant System Leak
A coolant leak may occur due to the damaged head gasket, wear and crack in the hoses, clamps, and radiator. These leakages will cause a rapid reduction in the coolant level.
With the decrease in the coolant level, the car will start to operate in extreme conditions. Also, due to the low coolant level in the tank, the radiator water may start to boil. This will also lead to the boiling of coolant in the tank.
Solutions For Addressing Coolant Boiling
You must investigate the exact reasons for the coolant boiling and fix them appropriately. Here we will mention the different fixing procedures for different causes. But do not touch any coolant system components while they are hot.
Replacing The Thermostat
When the thermostat malfunctions, follow these steps to replace it:
- Step 1: Locate the position of the thermostat in your car. Generally, you will find this near the meeting point of the radiator and hoses.
- Step 2: You must loosen the screws and clamps to detach the hoses from the radiator opening.
- Step 3: Remove all the bolts and screws from the thermostat to pull out the defective thermostat.
- Step 4: Now, take a new thermostat compatible with your car and place it in the exact position of the old one.
- Step 5: Tighten all the nuts and bolts to secure the new thermostat in its place.
- Step 6: Reattach all the hoses and clamps to their previous positions.
Flushing The Radiator
To flush off your car’s clogged radiator, you need to follow these steps:
- Step 1: Jack the front side of your vehicle and place a bucket underneath your car to collect the drained coolant.
- Step 2: Lifting the hood, first locate the radiator’s position.
- Step 3: You can see a pressure cap on the radiator top. Now, you need to twist the cap counterclockwise to remove it.
- Step 4: Now, go underneath the driver’s side bumper. You must find the radiator’s drain plug and remove it with a socket wrench.
- Step 5: The coolant will start to drain from the radiator. Reseal the drain plug after the draining of the liquid stops.
- Step 6: Insert a funnel in the place of the pressure cap. Then, pour water and appropriate radiator cleaner through it.
- Step 7: Start the engine and wait for 5 minutes.
- Step 8: Now, turn off your car’s engine and let it cool off for 10-15 minutes
- Step 9: Once the engine cools down, open the drain plug again and collect the water and cleaner mixture in a pan.
- Step 10: The initial color of the discharge will be brown. You need to pour clean water through the funnel until the discharge from down looks clear.
- Step 11: Refill the car’s radiator with the appropriate coolant mixture. You need to start the car engine for almost 15 minutes so that this coolant can run down to the entire coolant system.
- Step 12: Stop the car engine and let it cool down again. Now, keep pouring the coolant until it reaches a safe level.
Repairing Or Replacing The Water Pump

Generally, you can repair the water pump by tightening and loosing the connections or cleaning. If the damage is severe, you better replace the pump. Here are the steps for that:
- Step 1: Firstly, you need to disconnect the position and negative terminals of the battery.
- Step 2: Drain out the coolant before proceeding with the replacement.
- Step 3: The location of the water pump may vary with vehicles, so follow the particular car manual for your car.
- Step 4: Detach the radiator, shrouds, fans, and hoses to access the pump.
- Step 5: Pull out the bolts for taking out the water pump.
- Step 6: Remove the old gasket from the pump and clean the mating surface carefully.
- Step 7: Take a good-quality gasket and install the new gasket appropriately.
- Step 8: Now install the new water pump in the reverse sequence of the removal process.
- Step 9: Refill the coolant tank with coolant and connect the battery terminals.
Addressing The Coolant System Leak
If you detect a small leak on the radiator hoses, you can seal it with a flex seal. But it’s a temporary solution. You can detach the damaged radiator hoses by removing the attaching clamps for permanent solutions. Then, you can place the new hoses and tighten those clamps on their position again.
Sometimes you may also need to replace the radiator. For that, follow these steps:
- Step 1: Locate the position of your radiator and then detach the battery.
- Step 2: Drain the coolant from the radiator and then pull out all the hoses connecting the engine and radiator.
- Step 3: Remove the damaged thermostat and disconnect the fan from the radiator.
- Step 4: Remove the bracketry of the radiator by removing the bottom and top nut bolts sequentially. Then pull out the old radiator.
- Step 5: Attach the bracketry to a brand new radiator and install the radiator where the old one was.
- Step 6: Now, reattach the fans and hoses with the radiator.
- Step 7: Refill the radiator with coolant and reinstall all the battery connections.
Preventive Maintenance Tips For Avoiding Coolant-Related Problems

Resolving the coolant boiling issue can be pretty costly. But you can prevent or reduce this risk by following these preventive maintenance methods:
Regular Maintenance
Sometimes, the radiator can get blocked with dust and debris due to the lack of periodic cleaning. So, you must frequently clean the dust and debris from the engine coolant system.
Coolant System Checks
Monitor the system’s hoses, clamps, seals, and caps for possible leakage. Also, monitor the coolant level frequently. You also need to check whether the components are working fine or not.
Monitoring Temperature Gauge
You also need to monitor the temperature gauge frequently. If you find the temperature gauge is showing a too high reading, your car engine is overheating. You must resolve this issue soon; otherwise, the coolant will boil.
Experiencing coolant boiling in your vehicle can be a concerning issue, and it’s crucial to understand the underlying causes and take appropriate action. In addition, it’s important to recognize the significance of regular engine coolant changes and be aware of potential water pump issues. Our article on why should engine coolant be changed periodically explains the importance of routine coolant maintenance to prevent overheating, corrosion, and other cooling system problems. Meanwhile, our article on water pump leaking coolant sheds light on the potential causes and symptoms of a faulty water pump and provides guidance on addressing the issue. By exploring these related topics, you can gain a better understanding of coolant-related concerns and take appropriate measures to ensure the optimal performance and longevity of your vehicle’s cooling system.Conclusion
Coolant boiling indicates the overheating of the coolant and engine overheating. We already discussed: why is my coolant boiling? A faulty thermostat, radiator, water pump, and leakage in the entire cooling system can cause this issue.
The repair cost will keep increasing if you let this issue linger. That’s why you must fix this issue soon after diagnosing coolant boiling. You can also avoid the fixing cost by taking preventive methods for this coolant boiling issue.